
How to Maintain Leather Hiking Boots for Longevity

Quick Summary
To keep leather hiking boots lasting, clean off mud and grit after every walk, let them dry slowly at room temperature, and condition them every four to six weeks. Identify the leather finish first, because nubuck and suede need different products than full-grain.
- Clean boots soon after each walk, while mud is still soft, using a horsehair brush.
- Dry boots slowly at room temperature, never on a radiator or near direct heat.
- Condition every four to six weeks during regular use, applying a thin layer.
- Never apply wax or oil to nubuck or suede; use suede-safe or nubuck-specific products.
- Reproof waterproofing when water stops beading on the surface of the leather.
Table of Contents
- Why Leather Hiking Boots Need Regular Care
- Identifying Your Leather Type Before You Start
- How to Clean Leather Hiking Boots After Every Walk
- Drying Boots Safely Without Heat Damage
- How to Condition Leather Hiking Boots Without Drying Them Out
- How to Waterproof Leather Hiking Boots and Keep Them Breathable
- Leather Hiking Boot Care Products and What Each One Does
- A Care Schedule Based on How Often You Walk
- Common Mistakes and Troubleshooting, Plus When to Repair or Replace
- Frequently Asked Questions
Why Leather Hiking Boots Need Regular Care
Leather hiking boots are built to last, but they only last if you look after them. Mud, salt, rain and sweat slowly dry out the leather, crack the stitching and break down the waterproofing. Regular care stops that damage before it starts, and it is far cheaper than replacing a pair. A little routine goes a long way.
Think of care as a habit, not a chore. A quick clean after each walk, a light conditioning every few weeks and proper drying in between will keep your boots supple and protected for years. Skipping these steps is the main reason good boots fail early.
Watch out: Leaving wet boots in a boot room overnight without drying them is the fastest way to stiffen leather and loosen the glue in the sole.
Identifying Your Leather Type Before You Start
Not all leather reacts the same way to cleaning and conditioning, and using the wrong product can darken a finish, flatten a nap or leave a patchy sheen that never buffs out. Before you pick up a brush or a tin of cream, identify which of the three main finishes your boots use. The care routine is broadly the same, but the products and the pressure you apply are not.
Full-grain leather is the smoothest and most durable finish, with the outer surface left intact. It takes waxes, creams, oils and gels readily and is the most forgiving to condition. Field & Moor's Marsh Harrier boots use hydrophobic chestnut grain leather, which resists water well. Full-grain darkens slightly with oil-based products, so test on a hidden patch if an even colour matters to you.
Nubuck is full-grain leather that has been buffed on the outer surface to raise a fine, velvety nap. It is smooth to the touch but not sealed, so it marks easily and should never be treated with a heavy wax or oil, which mats the nap and leaves a permanent dark patch. Use a nubuck-specific cleaner and a protective spray instead, and brush the nap back up with a soft brush once dry.
Suede has a deeper, softer nap and is the most delicate of the three. It absorbs water quickly and stains readily. Clean it dry with a suede brush and a specialist suede eraser, and reproof only with a suede-safe spray. Creams, gels and waxes should be kept away from suede entirely.
A simple test helps confirm what you are dealing with. Put a drop of water on an inconspicuous part of the upper, such as the back of the heel. If it beads up and sits on the surface, the finish is sealed and smooth, which points to full-grain. If it soaks in and darkens the leather almost immediately, the surface is open, which points to nubuck or suede. Either way, test any new product on a small hidden patch first and leave it for a full day before treating the whole boot.
Watch out: applying a wax or oil to nubuck or suede is the most common way people permanently alter a finish, and the change cannot be reversed once the nap has matted.
How to Clean Leather Hiking Boots After Every Walk
Clean your boots as soon as practical after a walk, while the mud is still soft. Dried mud grinds into the leather and scratches the finish, so the sooner you deal with it the easier the job. A few minutes now saves a much longer scrub later.
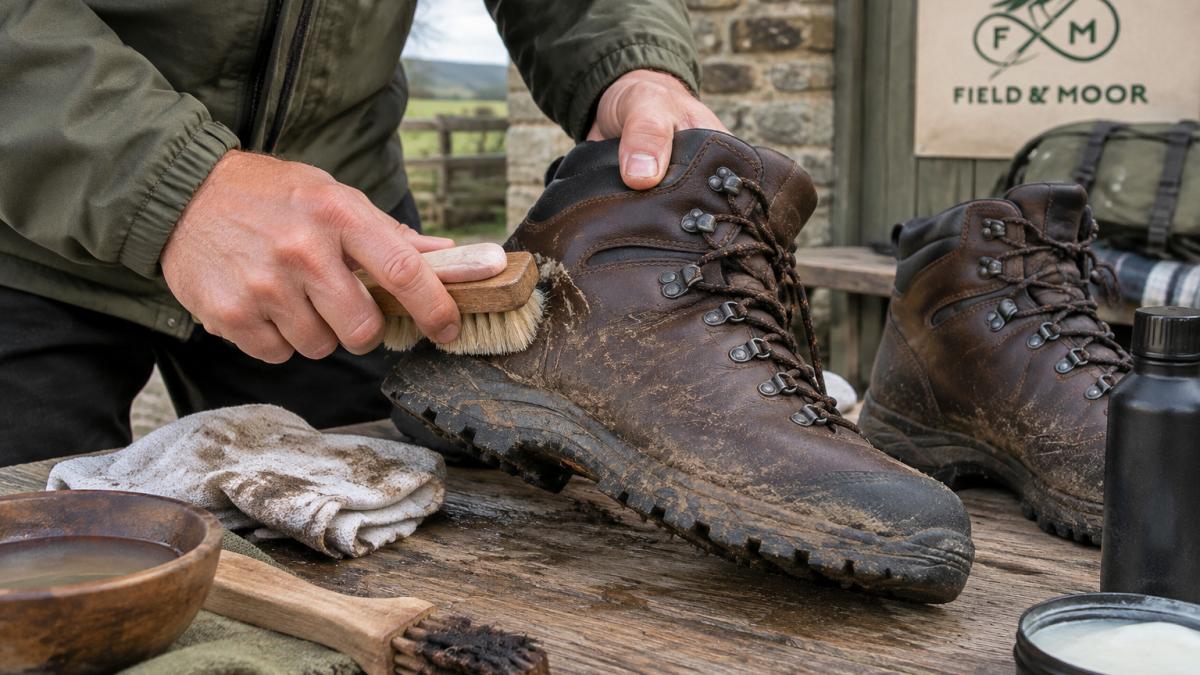
Work through the steps below in order:
- Knock off loose mud and stones against a solid surface
- Brush the upper with a soft horsehair brush in short, firm strokes
- Wipe the leather with a barely damp cloth
- Clean the sole and welt, where grit collects
- Leave the boots to dry before applying any product
Removing Mud, Grit and Salt
Grit causes the most wear, so get it out first. Use a horsehair brush to lift particles from the seams, around the toe cap and along the welt. For salt residue, which is common after walks near the coast or on gritted roads, wipe the affected area with a cloth dampened in plain water. Salt left to dry can leave white marks and draw moisture out of the leather.
Avoid soaking the boots or scrubbing hard with water. Too much moisture swells the leather and weakens the glue. The Field & Moor horse hair wooden boot brushes are a suitable tool for this job.
Cleaning the Lining and Insoles
Remove the insoles and let them air out after each walk. Sweat and damp feet build up inside the boot, and that moisture breaks down the lining over time. Wipe the inside of the boot with a dry cloth and let it breathe before putting the insoles back.
If the lining smells or feels grimy, use a cloth dampened with a little mild soap and water, then wipe it dry. Never use heavy cleaners inside the boot, as residue can irritate your feet and weaken the lining materials.
Drying Boots Safely Without Heat Damage
Drying is where many people go wrong. Heat is the enemy of leather. A radiator, hairdryer or a spot by the fire may dry the boots quickly, but it also pulls out the natural oils and causes the leather to crack and shrink.
Dry your boots slowly at room temperature, away from direct sunlight and heat sources. Stuff them loosely with newspaper or boot trees to hold their shape and draw out moisture. Change the paper if it becomes soaked. Drying usually takes a day or two, so plan around it and keep a second pair handy if you walk often.
Watch out: Putting wet boots directly on a radiator can stiffen the leather within a single session and cause visible cracking.
How to Condition Leather Hiking Boots Without Drying Them Out
Conditioning replaces the oils that walking and weather strip away. The aim is to feed the leather, not to coat it. Too much product clogs the pores and leaves a sticky finish that attracts dirt.
Apply a thin layer of conditioner with a soft cloth or the applicator brush, working it into the upper in small circles. Let it soak in for the time the product recommends, then buff the surface. The Collonil delicate cream cleans, softens and revives colour, and the Collonil leather gel conditions and adds water protection.
Condition every four to six weeks during regular use, and less often if the boots see only light wear. If your boots will sit unused for a season, learn how to store leather boots for long-term care. If the leather looks dull or feels stiff, it is due for conditioning.
How to Waterproof Leather Hiking Boots and Keep Them Breathable
Waterproofing and breathability work against each other if you overdo it. A thick, waxy layer can seal the leather so tightly that it traps sweat inside. The goal is a light treatment that keeps rain out while still letting the leather breathe.
Clean and dry the boots fully first, then apply a thin, even layer of waterproofing product. Field & Moor's Marsh Harrier boots include a Sympatex lining for waterproofing and breathability, so an outer treatment mainly protects the leather upper. Reapply after heavy use or when water stops beading on the surface.
Check the product label before you use it. Some treatments suit only certain leather finishes, and a mismatch can leave marks or affect the appearance of the boot.
Leather Hiking Boot Care Products and What Each One Does
Good results come from the right tools used in the right order. You do not need a large collection of products, but each one should have a clear job.
- Horsehair brushes: Remove mud and dust without scratching the leather
- Soft cotton cloths: Wipe, buff and apply product evenly
- Collonil delicate cream: Gently cleans, softens and revives colour
- Collonil leather gel: Conditions and adds water protection
- Spare laces and a shoehorn: Keep the fit and shape right over time
The Field & Moor luxury boot cleaning kit brings these items together in one travel bag, which makes it easy to keep everything in one place. You can browse the aftercare boot cleaning kit to see what it includes. It is a practical choice if you want a complete routine without buying each product separately.

A Care Schedule Based on How Often You Walk
A calendar alone is a poor guide, because two walkers who go out weekly can put very different strain on their boots depending on terrain, weather and load. Use frequency as a starting point, then let the condition of the boot set the real trigger. The table below gives a baseline; the triggers underneath it tell you when to act sooner.
| How often you walk | Clean | Dry | Condition | Waterproof |
|---|---|---|---|---|
| Occasional (monthly) | After each walk | Overnight | Every 2-3 months | When water stops beading |
| Weekly | After each walk | Overnight | Every 4-6 weeks | Every 2-3 months |
| Several times a week | After each walk | Between uses | Every 3-4 weeks | Every month |
Treat the intervals as a backstop rather than a rule. In practice, most experienced walkers clean and dry after every outing and let four signals decide when the deeper work is due.
- Condition when the leather looks dull or feels stiff. Run a thumb across the upper; if it creases dryly rather than flexing, the oils are low. This often happens after a run of wet walks followed by fast drying.
- Reproof when water stops beading. If rain soaks into the surface instead of running off, the treatment has worn through, even if the boots still feel dry inside. Reproof before the leather starts absorbing water, not after.
- Clean sooner after mud, salt or grit. Mud left to dry grinds into seams and scratches the finish; road salt draws moisture out of the leather and leaves white tide marks. Both warrant a clean and dry the same day rather than the next morning.
- Inspect after every wet walk. Check the welt, the toe flex point and the seams where the upper meets the sole. Small separations and loose stitching are cheap to fix early and expensive once water gets behind them.
Adjust the schedule for conditions as well as mileage. A short walk through wet, salty or very muddy ground does more damage than a longer dry-weather outing, so bring the clean and dry forward and check the boots more often. In prolonged wet spells, rotate between two pairs so each has a full day or two to dry at room temperature; boots worn damp day after day never fully recover, and the lining and glue suffer first.
Watch out: over-conditioning is as common as under-conditioning. If the leather feels tacky or attracts dust after treatment, you have applied too much, and the fix is to buff off the excess and wait longer before the next application rather than adding more.
Common Mistakes and Troubleshooting, Plus When to Repair or Replace
Most care problems come from a few avoidable habits. Over-conditioning leaves a greasy, dirt-catching surface. Drying too quickly cracks the leather. Ignoring grit lets it wear through the finish. If the boots look dull or stiff, start with a gentle clean and a light conditioning before trying anything stronger.
Some damage is beyond routine care. Worn soles, separated welts or deep cracks in the upper often mean a repair. To weigh your options, read how to decide between repairing leather boot soles or replacing. Where the damage is extensive or the leather is badly broken down, replacing the pair may be the better choice. Look at the cost of repair against the cost of new boots, and consider how much life the upper has left.
Frequently Asked Questions
How often should you clean leather hiking boots?
Brush off loose mud and grit after every walk, especially after wet or muddy ground, so dirt does not work into the leather and abrade the stitching. A full clean with a damp cloth and a mild leather cleaner is usually enough every few months for regular use, or sooner if the boots have been soaked or heavily soiled with salt or sweat. Brushing takes only a few minutes and prevents most of the gradual wear that shortens a boot's life.
How should you dry wet leather hiking boots?
Remove the insoles and loosen the laces, then let the boots dry slowly at room temperature, away from radiators, direct heat and strong sunlight. Stuff them loosely with newspaper or kitchen paper and change the paper as it becomes damp. Rapid heat can stiffen and crack leather, so avoid hair dryers, ovens and boot dryers placed too close. Allow a full day or more for thick leather uppers to dry through.
Can you use ordinary shoe polish on leather hiking boots?
Ordinary shoe polish is designed for smooth dress leather and can clog the grain of a rugged leather upper, leaving it stiff and less breathable. For hiking boots, a conditioner or cream suited to outdoor leather is the better choice, applied in thin coats and buffed in. Field and Moor's Collonil delicate cream cleans and softens, while Collonil leather gel conditions and waterproofs. Both are available in the Field and Moor luxury boot cleaning kit, priced at £36.00. Always test any product on a small hidden area first.
How do you restore waterproofing on leather hiking boots?
Clean the boots thoroughly and let them dry completely first, because dirt and residue stop treatments from bonding to the leather. Then apply a thin, even layer of a waterproofing product such as leather gel, working it into the seams and flex areas, and allow it to absorb overnight. Water that beads on the surface shows the treatment is working. Reproof whenever water starts soaking into the upper rather than beading off, usually every few months of regular use.
