
Long Term Maintenance for Leather Dress Shoes

Last Updated: October 22, 2026
Quick Summary
Long term maintenance for leather dress shoes means cleaning, conditioning, polishing and resting them on a schedule so the leather stays supple, holds its shape and resists water damage. Follow the order strip, clean, condition, polish, protect and rest, and put shoes on cedar trees the moment you take them off. Skip the routine and the leather dries, cracks at the flex points and loses structure.
- Brush shoes after every wear and condition every 4-6 weeks if worn daily.
- Use a pea-sized amount of cream polish per shoe and buff with a horsehair brush.
- Shoes go on cedar trees immediately after wear and air-dry at room temperature for 24 hours.
- Inspect soles every few months and repair once the sole thins at the ball of the foot.
- Goodyear-welted shoes can be resoled three or four times; cemented shoes are replace-not-repair.
Table of Contents
- Why Long Term Maintenance for Leather Dress Shoes Pays Off
- Your Leather Shoe Care Routine: The Core Sequence
- How to Polish Leather Shoes for a Lasting Shine
- Cedar Shoe Trees and the Art of Drying and Resting
- How Often to Resole Leather Shoes and When to Repair
- A Maintenance Calendar by Wear Frequency
- Care by Leather Type and Finish
- Product Quantity and Over-Conditioning Risks
- Weather Protection, Storage and Common Damage
- Conclusion
- Frequently Asked Questions
Why Long Term Maintenance for Leather Dress Shoes Pays Off
Good leather dress shoes are not a disposable purchase. They are a slow investment that rewards the owner who understands one simple truth: leather is skin, and skin needs feeding. At Field & Moor, we build our boots with Goodyear and storm-welted construction precisely so they can be repaired and worn for years, not seasons. The same logic applies to any quality pair of leather dress shoes.
Long term maintenance for leather dress shoes is the practice of cleaning, conditioning, polishing and resting footwear on a schedule so the leather stays supple, holds its shape and resists water damage. Skip it and the leather dries, cracks at the flex points and loses structure. Do it well and a good pair can outlast three cheap ones. Consistent application of these leather maintenance tips ensures that your other fine hide goods, such as those used on the course, remain just as resilient and durable as your footwear.
Here is what most guides get wrong: they treat shoe care as a rescue mission after damage appears. It is not. It is a routine, and the routine matters more than any single product.
Your Leather Shoe Care Routine: The Core Sequence
Every proper leather shoe care routine follows the same order: strip, clean, condition, polish, protect, rest. Doing the steps out of order, or skipping the conditioning step, is the most common mistake we see.
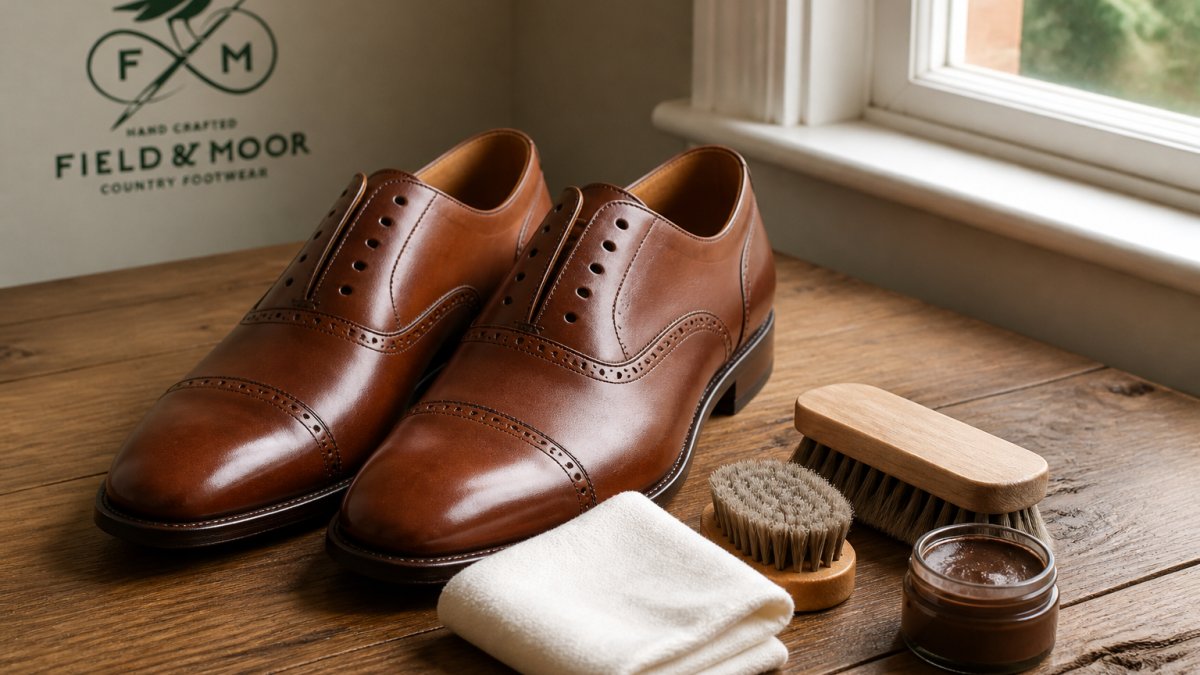
Our Field and Moor Leather aftercare Boot cleaning kit (£36.00) contains the full set for this sequence: a soft horsehair polishing brush, a round application brush, a lint-free cotton cloth, Collonil delicate cream and Collonil leather gel.

Step 1: Remove Laces, Brushes and Surface Dirt
Start by taking the laces out. This is not fussiness. Laces trap grit against the tongue and eyelets, and you cannot clean what you cannot reach. Brush the whole shoe with a soft horsehair brush to lift loose surface dirt, dust and dried mud. Work in short strokes and pay attention to the welt and the seam where the upper meets the sole, because that is where grit collects and slowly abrades the stitching.
Step 2: Clean, Condition and Nourish
Wipe the leather with a soft damp cloth, then apply a small amount of cream cleaner to lift ingrained dirt. Let it dry. Now condition. A leather conditioner replaces the oils that wear and weather strip out, keeping the leather supple and preventing the fine cracks that eventually become splits.
Work the conditioner in with a round applicator brush in thin layers. Let it absorb before adding more.
How to Polish Leather Shoes for a Lasting Shine
The answer is layers, not volume. A lasting shine comes from several thin coats of cream or wax polish, each buffed before the next goes on, rather than one thick coat that never sets properly. But the difference between a dull finish and a mirror finish comes down to understanding what each product actually does and applying it in the right order.
Cream Polish Versus Wax Polish: What Each Does
Cream polish is a emulsion of waxes, oils and solvents. The oils feed the leather and restore colour; the waxes sit on the surface and give a soft sheen. It is the right base coat for dress shoes because it conditions while it colours, and it is forgiving if you apply too much.
Wax polish is harder and contains a higher proportion of carnauba or beeswax with less oil. It builds a protective film that takes a high gloss and resists water, but it does not feed the leather and can dry it out over time if used alone. Use wax on the toe and heel where you want shine and protection, and cream on the flex points and vamp where the leather needs to stay supple.
A common pattern among experienced shoe carers is a cream base followed by one or two thin wax coats on the toe cap and heel only. The rest of the shoe gets cream alone. This gives you shine where it matters without making the whole upper stiff.
Application: Quantity, Timing and Technique
A pea-sized amount of cream polish covers one whole shoe. More than that and you are wasting product and risking buildup in the seams. Apply with a round applicator brush or a folded cotton cloth in small circular strokes, working the polish into the grain rather than smearing it on top.
Wait five to ten minutes for the solvents to flash off before buffing. If you buff too soon, the wax is still soft and you will drag it rather than set it. Buff with a horsehair brush using fast, light strokes. The friction warms the wax and brings up the gloss. A soft cotton cloth gives the final finish.
For wax, apply an even thinner coat than you think you need. A little wax goes a long way, and thick wax cracks at the flex point and looks worse than no polish at all. Build two or three thin layers rather than one thick one, buffing between each.
Troubleshooting Common Polishing Faults
- Cloudy or streaky finish: too much polish, not enough buffing, or polish applied to a damp shoe. Let the leather dry fully, then brush vigorously and apply a thinner coat.
- Polish cracking at the flex point: wax applied too thickly. Strip back with a little cream cleaner and reapply thin layers of cream rather than wax at the flex.
- Colour transfer onto trousers: excess wax or cream not buffed off. Brush the shoe thoroughly after the final coat and wipe the heel and sole edge with a cloth.
- Dull shine that will not come up: the leather is dry underneath. Condition first, let it absorb for twenty minutes, then polish.
Matching Polish to Shoe Colour
Use a polish within one shade of the shoe. Neutral polish adds shine without colour and is safe on multi-tone or antiqued finishes, but it will not hide scuffs. A matched coloured cream is better for restoring faded colour and covering light scuffs. For black shoes, black cream is fine; for tan or oxblood, a matched cream preserves the depth of colour that neutral cannot.
If you are unsure, test on the inside of the heel or under the tongue first. Some corrected-grain and patent finishes do not take wax at all, and a test patch tells you before you commit.
Cedar Shoe Trees and the Art of Drying and Resting
Cedar shoe trees are the cheapest insurance you can buy for a good pair of shoes. They absorb moisture from the inside, hold the shape of the shoe as it dries and leave a faint cedar scent that keeps the interior fresher.
The rule is simple: shoes go on trees the moment you take them off. Not the next morning. Moisture from your feet soaks into the lining and, left alone, that moisture warps the shape and breaks down the leather from within.
Never dry leather shoes near a radiator, on a hot pipe or in direct sun. Heat pulls moisture out too fast and hardens the leather. Let them air-dry at room temperature, ideally for a full 24-hour drying period, before they go back on your feet.
How Often to Resole Leather Shoes and When to Repair
How often to resole leather shoes depends on wear, surface and construction, but a good benchmark is to inspect the sole every few months and act the moment you see the sole wearing thin at the toe or ball of the foot. Once the outsole wears through to the welt or midsole, water gets in and the repair bill climbs.
But the more useful question for long-term ownership is not 'when do I resole' but 'is this shoe worth repairing at all'. That decision separates a pair that lasts a decade from one that gets thrown out prematurely.
Reading the Wear: What to Look For
Inspect the sole from the side and from underneath. The first place to go is the ball of the foot, where the sole flexes with every step. A sole that is still thick at the toe but thin at the ball is normal wear. A sole that is thin at the toe means you are dragging your feet, which is a gait issue as much as a shoe issue.
Check the heel first. Heels wear faster than soles and are cheaper to replace. A worn heel that is left too long wears through to the leather heel stack, and that turns a cheap heel replacement into a full rebuild. Uneven heel wear also throws off your gait and can cause knee and back problems over time.
Field and Moor Leather aftercare Boot cleaning kit →
Run your thumb along the welt stitching. If the stitches are frayed or the welt is lifting, water can get between the upper and the sole. That is a repair job for a cobbler, not a DIY fix.
Signs it is time to repair:
- The sole is thin at the ball of the foot
- You can feel grit or damp through the sole
- Stitching at the welt is fraying
- The heel is worn unevenly
- The sole edge is cracking or separating from the upper
Construction Determines Whether a Resole Is Possible
Goodyear-welted shoes can be resoled repeatedly because the welt is stitched, not glued. The cobbler cuts the stitches, lifts off the old sole, and stitches a new one to the same welt. The upper is not damaged in the process, so the shoe can be rebuilt several times over its life.
Blake-stitched shoes can also be resoled, but the stitching goes through the insole, so each resole removes a little insole material. They are good for one or two resoles, not five.
Cemented shoes, where the sole is glued to the upper, usually cannot be resoled economically. The glue bond is broken when the sole is removed, and the upper is often damaged in the process. A cemented shoe is a replace-not-repair item.
That is exactly why we build our boots with Goodyear and storm-welted construction. A stitched shoe can be rebuilt; a cemented one usually cannot.
The Repair-Versus-Replace Decision
Repair beats replace almost every time for a stitched leather shoe. A resole costs a fraction of a new pair, and the upper, which is the expensive part, is preserved. A common pattern is that a goodyear-welted shoe can be resoled three or four times over its life, and the upper outlasts several sets of soles if it is conditioned and rested properly.
The calculus changes when the upper is damaged. Cracks that go through the leather at the flex point, a torn welt, or a collapsed heel counter are expensive or impossible to fix. At that point, the repair bill approaches the cost of a new pair and replacement makes sense.
A simple rule: if the upper is sound and the construction is stitched, repair. If the upper is cracked through or the construction is cemented, replace.
What a Resole Involves
A full resole is not a quick job. A cobbler will remove the old sole and heel, inspect the welt and midsole, replace any damaged cork filling, attach a new sole, trim and finish the edges, and reheel. Turnaround is typically a week or two depending on the workshop. Ask whether the cobbler uses a stitched or glued method, a glued resole on a Goodyear-welted shoe defeats the point of the construction.
For dress shoes, a leather sole with a rubber top piece at the toe is a common choice: it looks correct with a suit and gives grip where you need it. For wet climates, a rubber sole or a thin rubber oversole protects the leather from water without changing the silhouette.
A Maintenance Calendar by Wear Frequency
This is where most guides stop short. A care routine only works if it is tied to how often you actually wear the shoes. Use this calendar as your baseline.
| Wear Frequency | Brush After Each Wear | Condition | Polish | Inspect Soles |
|---|---|---|---|---|
| Daily | Yes | Every 4-6 weeks | Every 2-3 weeks | Monthly |
| 2-3 times a week | Yes | Every 6-8 weeks | Monthly | Every 2 months |
| Weekly or less | Yes | Every 3 months | Every 2-3 months | Quarterly |
| Seasonal | Yes before storage | Before and after storage | Before storage | Before storage |
The core principle behind the calendar: rest between wears. A pair worn daily never fully dries. Rotate two pairs and each gets a full 24-hour drying period, which alone extends their life considerably.
Care by Leather Type and Finish
Not all leather wants the same treatment. Match your products to the finish and you avoid most damage.
- Smooth calf leather: cream polish and wax, the standard routine
- Patent leather: wipe with a damp cloth only, never use wax or conditioner
- Suede and nubuck: a suede brush and protector spray, no cream polish
- Oiled or pull-up leather: a light conditioner or dubbin, no hard wax shine
- Grained leather: cream polish worked into the grain with a brush
The mistake is treating every finish like smooth calf. Wax on suede ruins the nap. Cream on patent leather clouds it.
Product Quantity and Over-Conditioning Risks
More product is not better. Over-conditioning is a real problem and one of the most common mistakes we see. Too much conditioner or polish leaves a tacky residue that attracts dust, clogs the leather's pores and stops it breathing. The leather goes soft and floppy instead of holding its shape.
The right amount is less than you think. A pea-sized amount of conditioner covers a whole shoe. Build in thin layers and let each one absorb. If the leather still feels greasy after ten minutes, you have used too much, so wipe off the excess with a clean cloth.
Weather Protection, Storage and Common Damage
Water is leather's quiet enemy. Wet leather swells, dries unevenly and stiffens, and repeated soaking breaks down the finish. A waterproofing product applied to clean, dry leather gives you a protective layer that sheds rain and stops stains setting in.
Store shoes on trees, in a breathable bag, away from damp and heat. Never seal leather in plastic, because trapped moisture causes mould.
Common damage and its usual cause:
- Cracked flex points: skipped conditioning
- White salt marks: road salt left on wet leather
- Warped shape: no shoe trees, or drying too close to heat
- Cloudy finish: too much polish, not enough buffing
Our Field and Moor Horse hair wooden boot brushes (£12.00) are made in Germany and built to last, and the round applicator is ideal for working wax, mink oil or dubbin into dried leather.

Conclusion
The challenge with leather dress shoes is not buying well. It is keeping them well, year after year, through wet winters and long days on your feet. The routine is simple, but it only pays off if you actually follow it.
At Field & Moor, we build every pair to be maintained and repaired rather than replaced. Our Goodyear and storm-welted construction, waterproof Sympatex linings and rugged Vibram soles are made for exactly this kind of long-term care. Get started with Field & Moor and invest in footwear built to last for years of adventure.
Frequently Asked Questions
How often should I condition leather dress shoes?
Condition when the leather starts to feel dry or looks dull, which for regular wear is roughly every four to six weeks. If you wear the same pair daily, condition monthly; if you rotate several pairs, every two to three months is enough. Always clean off surface dirt first so the conditioner reaches the leather rather than the grit. Use a small amount of cream or leather gel, work it in with a horsehair applicator brush, and let it absorb before polishing.
How long should leather dress shoes rest between wears?
Give leather dress shoes a full 24 hours between wears. Leather absorbs moisture from your feet and needs time to air-dry naturally; wearing the same pair two days running keeps it damp, which breaks down the structure and encourages creasing. A simple rotation of two or three pairs lets each one recover, and cedar shoe trees inserted straight after wearing help draw out moisture and hold the shape while the shoes rest.
When should leather dress shoes be resoled?
Check the sole every few months. Resole when the tread has worn thin at the toe or heel, when you can feel the ground through the sole, or when stitching starts to fray. For Goodyear-welted shoes, a competent cobbler can replace the sole without damaging the upper, so catching wear early extends the shoe's life considerably. Leaving a worn sole too long lets water into the welt and can make the repair far more expensive.
Are cedar shoe trees good for leather dress shoes?
Yes. Cedar shoe trees absorb moisture left by the foot, hold the shoe's shape as it dries and leave a faint fresh scent. Insert them while the shoes are still slightly warm from wear, and choose a tree that fills the shoe without forcing it. A full-toe cedar tree is better than a narrow one because it supports the vamp and prevents the toe from curling. Avoid plastic trees, which trap moisture rather than drawing it away.